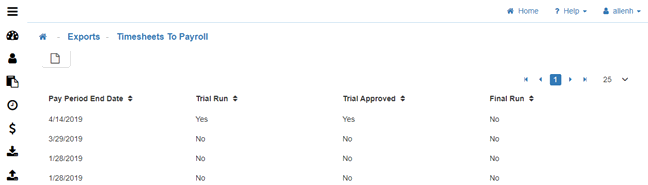
Timesheets To Payroll
The Timesheets To Payroll screen looks at the Export Interface to export Time (and internal Attendance duties if your LightWork Time is paired with LightWork Attendance) from LightWork to your Payroll system.
Note: If you’re running a Timesheet to Payroll Export and using Attendance regardless of the Type (selected in the Maintenance) if applicable the Export will process internal LightWork Attendance duties.
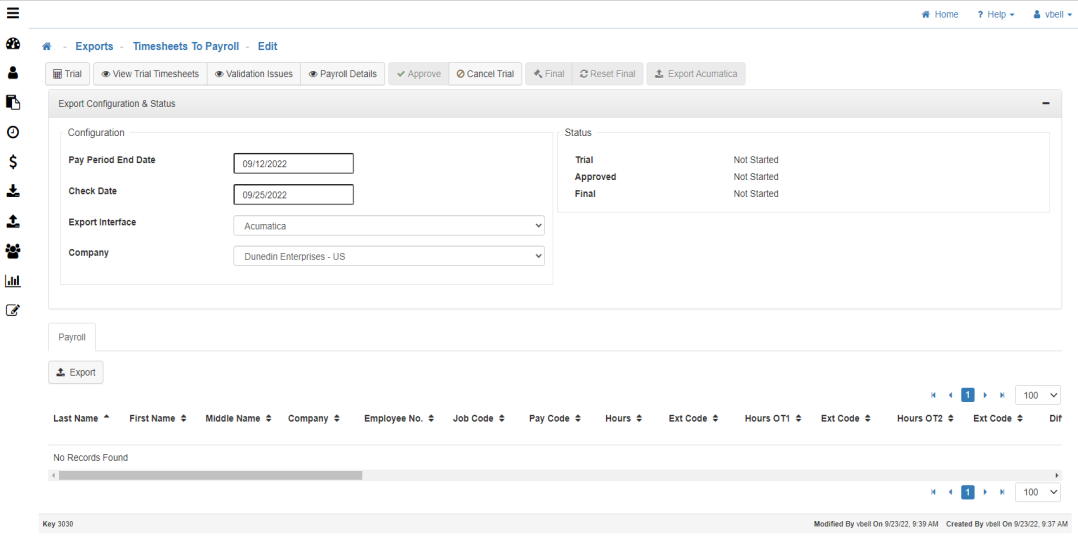
Timesheets to Payroll Toolbar
Going from left to right.
![]()
![]()
-
New
Allows you to create a new export file. -
Delete
Will delete the export file that is currently open. -
Trial
Clicking this will run the trial for the Pay Period End Date selected in the 'Export Configuration & Status' section. -
View Trial Timesheets
This report applies specifically to LightWork Timesheet issues. I.e. Timesheets not being pulled into the export because they are not at the correct status. -
Validation Issues
This report applies to specific issues. I.e. the Employee does not exist in the payroll site, Employee is not fully setup in your external system, or Earning Codes are not properly associated. -
Payroll Details
This report provides insight into the Employee's Timesheets that qualify for Export, to include the Employee Name(s), Pay Code(s), HR Code(s), Hours, Unit Rate(s), Differential Hour(s), Shift ID, Shift Differential, and the Pay Period End Date. -
Approve
Clicking this means you have reviewed the Timesheets in the trial and the time is correct for all Employees listed. -
Cancel Trial
Clicking this will cancel the trial. You will need to do this if an adjustment needs to be made to a Timesheet after a trial has been run because starting a payroll export locks all Timesheets involved. -
Final
Clicking this will send the Employee Timesheet information to your payroll system. -
Reset Final
Clicking this will reset the finalized Export, and reset all Employee Timesheets included in the Export back to an 'Open' status. This will allow for modifications to be made to the Timesheets.
Note: Once a Reset Final has been conducted, all Timesheets will need to be Approved again for them to qualify for the Export, and you will need to restart the Export steps starting with 'Trial'.
Generating a Timesheet Export
Important: Ensure the latest pay information is updated in LightWork Timesheets. In order to export time or attendance information the Export Interface Maintenance must be set up first. If this is not setup, please contact your LightWork consultant for assistance.
-
New Timesheet Export
To create a new Timesheet export, click on 'New' in the toolbar. -
Configuration Information
-
Pay Period End Date
This date will be used to gather all Timesheets that have a matching Pay Period end date.
Note: The Pay Period end date for a Timesheet comes from Pay Policy setup. (Each employee has a Pay Policy assigned them). -
Check Date
This will be transferred to the payroll software. -
Export Interface
The names that appear in the drop-down box come from the Description field of each Export Interface you set up. -
Company
The Company ID associated with the company that you are exporting Timesheets for. -
Trial
To run a trial Timesheet export, click on the 'Trial' button in the toolbar. This will generate a listing of all Timesheet entries for Timesheets that reached the 'HR APPROVAL' level.
Note: The Payroll Status on the Timesheets will be flagged as 'TRIAL' and no changes can be made to them once this is done. -
View Trial Timesheets
Click on the 'View Trial Timesheets' button in the toolbar to create a report of all records that are not ready for the trial export, and all records that need to be corrected before the export can run.
Note: Any unqualified Timesheets will be listed on the first page, followed by all qualified Timesheets, if there are no unqualified Timesheets the report will list only the qualified Timesheets. A Timesheet may be identified as unqualified for reasons such as already been processed/exported, or is being processed in another 'run', or if it is not at the Maximum Approval Level. -
Review
Review the trial grid summary at the bottom of the page, which lists the Employee(s) who's time is being exported, their total hours, and pay amounts. -
Sort
To 'Sort/Group' the trial grid click on any column header and it will sort by ascending/descending order.
Example: Group by the 'Ext Code' will allow HR to see all Employees getting paid by the Sage Abra Earning code. -
Export
Use the 'Export' button to export the data to Excel for HR to group, sort and summarize in any manner desired.
Note: If a Timesheet needs to be changed, the trial will need to be canceled by clicking the 'Cancel Trial' button. Once the Timesheet changes are made HR will need to start again by clicking the 'Trial' button. -
Approve
If HR is satisfied with the trial Timesheets they can click on the 'Approve' button, else they can click on the 'Cancel Trial' button. If they click 'Cancel Trial', the system will unlock the Timesheets allowing HR to go back and make changes. After approving the trial, the 'Final' export button is enabled. The data is now ready for export. -
Data Backup
Make a backup of the HRMS data using the standard HRMS procedures. -
Final
Click the 'Final' button which will mark the respective Timesheet Status to Final and depending on setup, you will either: -
Move data to an export file (to be imported by your Payroll software).
-
Directly import into your Payroll system.
-
If using Sage Abra, the Final button will move data to the PRPOST file and PREARNS.
-
If using Sage HRMS, the Final button will move data to the UPTCHD and UPTCDT.
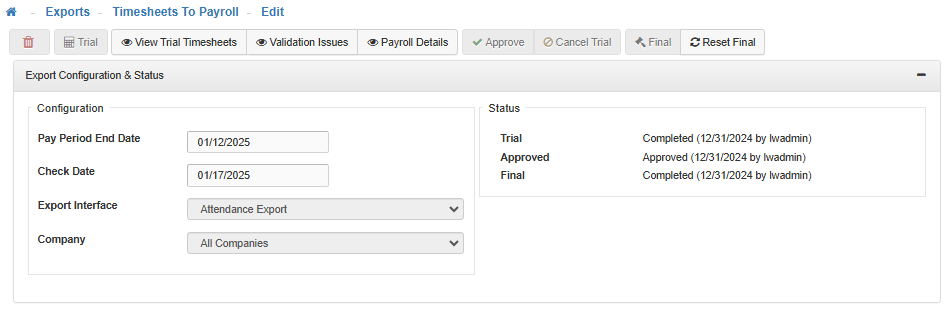
Attendance Module Export Process
Note: If you’re running a Timesheet to Payroll Export and using Attendance regardless of the Type (selected in the Maintenance) if applicable the Export will process LightWork Attendance duties.
-
Export Process
After selecting the Attendance Export option under the Export Interface field and filling out all other export configuration option settings displayed above, the Trial can be initiated using the Trial button. The process for running the Trial, Approving, and Finalizing the Export is seamless and identical to any other Export Interface type. -
Transactions
In an Attendance scenario, after the Final status is completed, the Timesheets to Payroll Export ‘hooks’ into Attendance to generate Transactions from attendance-related Timesheet Line items that are then added to the Employee’s Profile as Attendance Transactions. These Transactions though at that point have not been Accrued to get them to be part of Attendance Balances until the Accruals are processed. -
Process Accruals
After processing the Export Finalization, you can then accrue those Transactions so they reflect in the Attendance Plan Balances by processing a bulk accrual from the Attendance > Process Accruals link within the navigation menu, or by processing an accrual for a single Employee from the Profiles > Attendance > Plans card for that Employee. This would then accrue those Transactions so they will be reflected in the Attendance Plan Balances.
Note: Attendance Plan Balances are not affected by transactions until they are run as part of an Accrual.